
Here I demonstrate, with repeatable steps, how to fire-up a Hadoop cluster on Amazon EC2, load data onto the HDFS (Hadoop Distributed File-System), write map-reduce scripts in Ruby and use them to run a map-reduce job on your Hadoop cluster. You will not need to ssh into the cluster, as all tasks are run from your local machine. Below I am using my MacBook Pro as my local machine, but the steps I have provided should be reproducible on other platforms running bash and Java.
- Fire-Up Your Hadoop Cluster
- Setting Up Your Local Hadoop Client
- Defining The Map-Reduce Task
- Uploading Your Data To HDFS (Hadoop Distributed FileSystem)
- Coding Your Map And Reduce Scripts in Ruby
- Running The Hadoop Job
- The Results
- Conclusion
- Resources
Fire-Up Your Hadoop Cluster
I choose the Cloudera distribution of Hadoop which is still 100% Apache licensed, but has some additional benefits. One of these benefits is that it is released by Doug Cutting, who started Hadoop and drove it’s development at Yahoo! He also started Lucene, which is another of my favourite Apache Projects, so I have good faith that he knows what he is doing. Another benefit, as you will see, is that it is simple to fire-up a Hadoop cluster.
I am going to use Cloudera’s Whirr script, which will allow me to fire up a production ready Hadoop cluster on Amazon EC2 directly from my laptop. Whirr is built on jclouds, meaning other cloud providers should be supported, but only Amazon EC2 has been tested. Once we have Whirr installed, we will configure a hadoop.properties file with our Amazon EC2 credentials and the details of our desired Hadoop cluster. Whirr will use this hadoop.properties file to build the cluster.
If you are on Debian or Redhat you can use either apt-get or yum to install whirr, but since I’m on Mac OS X, I’ll need to download the Whirr script.
The current version of Whirr 0.2.0, hosted on the Apache Incubator site, is not compatible with Cloudera’s Distribution for Hadoop (CDH), so I’m am downloading version 0.1.0+23.
mkdir ~/src/cloudera
cd ~/src/cloudera
wget https://archive.cloudera.com/cdh/3/whirr-0.1.0+23.tar.gz
tar -xvzf whirr-0.1.0+23.tar.gz
To build Whirr you’ll need to install Java (version 1.6), Maven ( >= 2.2.1) and Ruby ( >= 1.8.7). If you’re running with the latest Mac OS X, then you should have the latest Java and I’ll assume, due to the title of this post, that you can manage the Ruby version. If you are not familiar with Maven, you can install it via Homebrew on Mac OS X using the brew command below. On Debian use apt-get install maven2.
sudo brew update
sudo brew install maven
Once the dependencies are installed we can build the whirr tool.
cd whirr-0.1.0+23
mvn clean install
mvn package -Ppackage
In true Maven style, it will download a long list of dependencies the first time you build this. Be patient.
Ok, it should be built now and if you’re anything like me, you would have used the time to get a nice cuppa tea or a sandwich. Let’s sanity check the whirr script…
bin/whirr versionYou should see something like “Apache Whirr 0.1.0+23″ output to the terminal.
Create a hadoop.properties file with the following content.
whirr.service-name=hadoop
whirr.cluster-name=myhadoopcluster
whirr.instance-templates=1 jt+nn,1 dn+tt
whirr.provider=ec2
whirr.identity=<cloud-provider-identity>
whirr.credential=<cloud-provider-credential>
whirr.private-key-file=${sys:user.home}/.ssh/id_rsa
whirr.public-key-file=${sys:user.home}/.ssh/id_rsa.pub
whirr.hadoop-install-runurl=cloudera/cdh/install
whirr.hadoop-configure-runurl=cloudera/cdh/post-configure
Replace <cloud-provider-identity> and <cloud-provider-credential> with your Amazon EC2 Access Key ID and Amazon EC2 Secret Access Key (I will not tell you what mine is).
This configuration is a little boring with only two machines. One machine for the master and one machine for the worker. You can get more creative once you are up and running. Let’s fire up our “cluster”.
bin/whirr launch-cluster --config hadoop.propertiesThis is another good time to put the kettle on, as it takes a few minutes to get up and running. If you are curious, or worried that things have come to a halt then Whirr outputs a whirr.log in the current directory. Fire-up another terminal window and tail the log.
cd ~/src/cloudera/whirr-0.1.0+23
tail -F whirr.log
16 minutes (and several cups of tea) later the cluster is up and running. Here is the output I saw in my terminal.
Launching myhadoopcluster cluster
Configuring template
Starting master node
Master node started: [[id=us-east-1/i-561d073b, providerId=i-561d073b, tag=myhadoopcluster, name=null, location=[id=us-east-1d, scope=ZONE, description=us-east-1d, parent=us-east-1], uri=null, imageId=us-east-1/ami-d59d6bbc, os=[name=null, family=amzn-linux, version=2010.11.1-beta, arch=paravirtual, is64Bit=false, description=amzn-ami-us-east-1/amzn-ami-2010.11.1-beta.i386.manifest.xml], userMetadata={}, state=RUNNING, privateAddresses=[10.113.23.123], publicAddresses=[72.44.45.199], hardware=[id=m1.small, providerId=m1.small, name=m1.small, processors=[[cores=1.0, speed=1.0]], ram=1740, volumes=[[id=null, type=LOCAL, size=10.0, device=/dev/sda1, durable=false, isBootDevice=true], [id=null, type=LOCAL, size=150.0, device=/dev/sda2, durable=false, isBootDevice=false]], supportsImage=Not(is64Bit())]]]
Authorizing firewall
Starting 1 worker node(s)
Worker nodes started: [[id=us-east-1/i-98100af5, providerId=i-98100af5, tag=myhadoopcluster, name=null, location=[id=us-east-1d, scope=ZONE, description=us-east-1d, parent=us-east-1], uri=null, imageId=us-east-1/ami-d59d6bbc, os=[name=null, family=amzn-linux, version=2010.11.1-beta, arch=paravirtual, is64Bit=false, description=amzn-ami-us-east-1/amzn-ami-2010.11.1-beta.i386.manifest.xml], userMetadata={}, state=RUNNING, privateAddresses=[10.116.147.148], publicAddresses=[184.72.179.36], hardware=[id=m1.small, providerId=m1.small, name=m1.small, processors=[[cores=1.0, speed=1.0]], ram=1740, volumes=[[id=null, type=LOCAL, size=10.0, device=/dev/sda1, durable=false, isBootDevice=true], [id=null, type=LOCAL, size=150.0, device=/dev/sda2, durable=false, isBootDevice=false]], supportsImage=Not(is64Bit())]]]
Completed launch of myhadoopcluster
Web UI available at https://ec2-72-44-45-199.compute-1.amazonaws.com
Wrote Hadoop site file /Users/phil/.whirr/myhadoopcluster/hadoop-site.xml
Wrote Hadoop proxy script /Users/phil/.whirr/myhadoopcluster/hadoop-proxy.sh
Started cluster of 2 instances
HadoopCluster{instances=[Instance{roles=[jt, nn], publicAddress=ec2-72-44-45-199.compute-1.amazonaws.com/72.44.45.199, privateAddress=/10.113.23.123}, Instance{roles=[tt, dn], publicAddress=/184.72.179.36, privateAddress=/10.116.147.148}], configuration={fs.default.name=hdfs://ec2-72-44-45-199.compute-1.amazonaws.com:8020/, mapred.job.tracker=ec2-72-44-45-199.compute-1.amazonaws.com:8021, hadoop.job.ugi=root,root, hadoop.rpc.socket.factory.class.default=org.apache.hadoop.net.SocksSocketFactory, hadoop.socks.server=localhost:6666}}
Whirr has created a directory with some files in our home directory…
~/.whirr/myhadoopcluster/hadoop-proxy.sh
~/.whirr/myhadoopcluster/hadoop-site.xml
This hadoop-proxy.sh is used to access the web interface of Hadoop securely. When we run this it will tunnel through to the cluster and give us access in the web browser via a SOCKS proxy.
You need to configure the SOCKS proxy in either your web browser or, in my case, the Mac OS X settings menu.
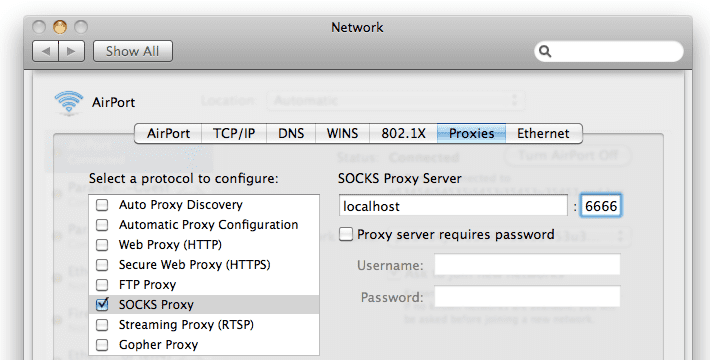
Hadoop SOCKS Proxy Configuration for Mac OS X
Now start the proxy in your terminal…
(Note: There has still been no need to ssh into the cluster. Everything in this post is done on our local machine)
sh ~/.whirr/myhadoopcluster/hadoop-proxy.sh

   Running proxy to Hadoop cluster at
   ec2-72-44-45-199.compute-1.amazonaws.com.
   Use Ctrl-c to quit.
The above will output the hostname that you can access the cluster at. On Amazon EC2 it looks something like https://ec2-72-44-45-199.compute-1.amazonaws.com:50070/dfshealth.jsp. Use this hostname to view the cluster in your web browser.
https://<hostname>:50070/dfshealth.jsp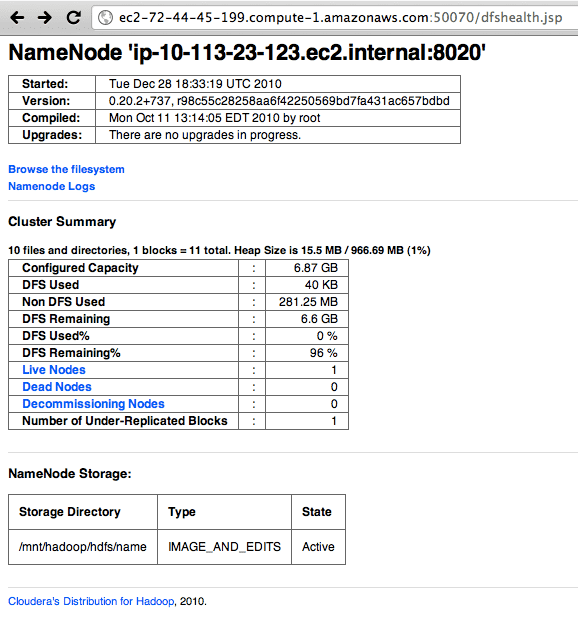
HDFS Health Dashboard
If you click on the link to “Browse the filesystem” then you will notice the hostname changes. This will jump around the data-nodes in your cluster, due to HDFS’s distributed nature. You only currently have one data-node. On Amazon EC2 this new hostname will be the internal hostname of data-node server, which is visible because you are tunnelling through the SOCKS proxy.
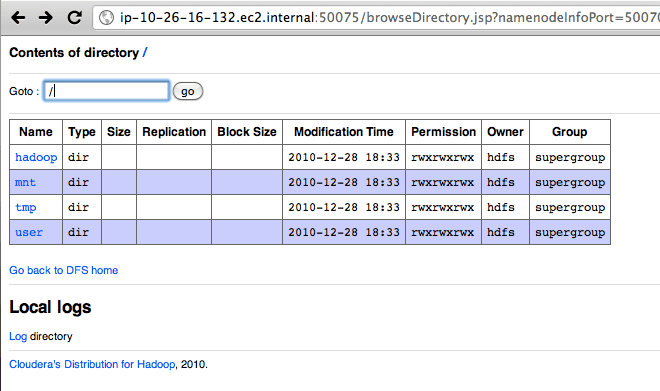
HDFS File Browser
Ok! It looks as though our Hadoop cluster is up and running. Let’s upload our data.
Setting Up Your Local Hadoop Client
To run a map-reduce job on your data, your data needs to be on the Hadoop Distributed File-System. Otherwise known as HDFS. You can interact with Hadoop and HDFS with the hadoop command. We do not have Hadoop installed on our local machine. Therefore, we can either log into one of our Hadoop cluster machines and run the hadoop command from there, or install hadoop on our local machine. I’m going to opt for installing Hadoop on my local machine (recommended), as it will be easier to interact with the HDFS and start the Hadoop map-reduce jobs directly from my laptop.
Cloudera does not, unfortunately, provide a release of Hadoop for Mac OS X. Only debians and RPMs. They do provide a .tar.gz download, which we are going to use to install Hadoop locally. Hadoop is built with Java and the scripts are written in bash, so there should not be too many problems with compatibility across platforms that can run Java and bash.
Visit Cloudera CDH Release webpage and select CDH3 Patched Tarball. I downloaded the same version hadoop-0.20.2+737.tar.gz that Whirr installed on the cluster.
tar -xvzf hadoop-0.20.2+737.tar.gz
sudo mv hadoop-0.20.2+737 /usr/local/
cd /usr/local
sudo ln -s hadoop-0.20.2+737 hadoop
echo 'export HADOOP_HOME=/usr/local/hadoop' >> ~/.profile
echo 'export PATH=$PATH:$HADOOP_HOME/bin' >> ~/.profile
source ~/.profile
which hadoop # should output "/usr/local/hadoop/bin/hadoop"
hadoop version # should output "Hadoop 0.20.2+737 ..."
cp ~/.whirr/myhadoopcluster/hadoop-site.xml /usr/local/hadoop/conf/
Now run your first command from your local machine to interact with HDFS. This following command is similar to “ls -l /” in bash.
hadoop fs -ls /You should see the following output which lists the root on the Hadoop filesystem.
10/12/30 18:19:59 WARN conf.Configuration: DEPRECATED: hadoop-site.xml found in the classpath. Usage of hadoop-site.xml is deprecated. Instead use core-site.xml, mapred-site.xml and hdfs-site.xml to override properties of core-default.xml, mapred-default.xml and hdfs-default.xml respectively
Found 4 items
drwxrwxrwx   - hdfs supergroup          0 2010-12-28 10:33 /hadoop
drwxrwxrwx   - hdfs supergroup          0 2010-12-28 10:33 /mnt
drwxrwxrwx   - hdfs supergroup          0 2010-12-28 10:33 /tmp
drwxrwxrwx   - hdfs supergroup          0 2010-12-28 10:33 /user
Yes, you will see a depreciation warning, since hadoop-site.xml configuration has been split into multiple files. We will not worry about this here.
Defining The Map-Reduce Task
We are going write a map-reduce job that scans all the files in a given directory, takes the words found in those files and then counts the number of times words begin with any two characters.
For this we’re going to use a dictionary file found on my Mac OS X /usr/share/dict/words. It contains 234936 words, each on a newline. Linux has a similar dictionary file.
Uploading Your Data To HDFS (Hadoop Distributed FileSystem)
hadoop fs -mkdir input
hadoop fs -put /usr/share/dict/words input/
hadoop fs -ls input
You should see output similar to the following, which list the words file on the remote HDFS. Since my local user is “phil”, Hadoop has added the file under /user/phil on HDFS.
Found 1 items
-rw-r--r--   3 phil supergroup    2486813 2010-12-30 18:43 /user/phil/input/words
Congratulations! You have just uploaded your first file to the Hadoop Distributed File-System on your cluster in the cloud.
Coding Your Map And Reduce Scripts in Ruby
Map-Reduce can actually be thought of as map-group-reduce. The “map” sucks in the raw data, cuts off the fat, removes the bones and outputs the smallest possible piece of output data for each piece of input data. The “map” also outputs the key of the data. Our key will be the two-letter prefix of each word. These keys are used by Hadoop to “group” the data together. The “reduce” then takes each group of data and “reduces” it. In our case the “reduce” will be the counting occurrences of the two-letter prefixes.
Hadoop will do much of the work for us. It will recurse the input directory, open the files and stream the files one line at a time into our “map” script via STDIN. We will output zero, one or many output lines to STDOUT for each line of input. Since we know that our input file has exactly one word per line, we can simplify our script and always output exactly one two-letter prefix for each input line. (EDIT: words with one letter will not result in any output).
The output of our “map” script to STDOUT will have to be Hadoop friendly. This means we will output our “key”, then a tab character then our value and then a newline. This is what the streaming interface expects. Hadoop needs to extract the key to be able to sort and organise the data based on this key.
<key><tab><value><newline>Our value will always be “1″, since each line has only one word with only once instance of the two-letter prefix of that word.
For instance, if the input was “Apple” then we would output the key “ap” and value “1″. We have seen the prefix “ap” only once in this input.
You should note that the value can be anything that your reduce script can interpret. For instance, the value could be a string of JSON. Here, we are keeping it very simple.
ap<tab>1<newline>Let’s code up the mapper as map.rb
# Ruby code for map.rb

ARGF.each do |line|

   # remove any newline
   line = line.chomp

   # do nothing will lines shorter than 2 characters
   next if ! line || line.length < 2

   # grab our key as the two-character prefix (lower-cased)
   key = line[0,2].downcase

   # value is a count of 1 occurence
   value = 1

   # output to STDOUT
   # <key><tab><value><newline>
   puts key + "\t" + value.to_s

end
Now we have our mapper script, let’s write the reducer.
Remember, the reducer is going to count up the occurences for each two-character prefix (our “key”). Hadoop will have already grouped our keys together, so even if the mapper output is in shuffled order, the reducer will now see the keys in sorted order. This means that the reducer can watch for when the key changes and know that it has seen all of the possible values for the previous key.
Here is an example of the STDIN and STDOUT that map.rb and reduce.rb might see. The data flow goes from left to right.
| map.rb STDIN |
map.rb STDOUT |
Hadoop sorts keys |
reduce.rb STDIN |
reduce.rb STDOUT |
|---|---|---|---|---|
| Apple Monkey Orange Banana APR Bat appetite |
ap 1 mo 1 or 1 ba 1 ap 1 ba 1 ap 1 |
ap 1 ap 1 ap 1 ba 1 ba 1 mo 1 or 1 |
ap 3 ba 2 mo 1 or 1 |
Let’s code up the reducer as reduce.rb
# Ruby code for reduce.rb

prev_key = nil
key_total = 0

ARGF.each do |line|

   # remove any newline
   line = line.chomp

   # split key and value on tab character
   (key, value) = line.split(/\t/)

   # check for new key
   if prev_key && key != prev_key && key_total > 0

      # output total for previous key

      # <key><tab><value><newline>
      puts prev_key + "\t" + key_total.to_s

      # reset key total for new key
      prev_key = key
      key_total = 0

   elsif ! prev_key
      prev_key = key

   end

   # add to count for this current key
   key_total += value.to_i

end
You can test out your scripts on a small sample by using the “sort” command in replacement for Hadoop.
cat /usr/share/dict/words | ruby map.rb | sort | ruby reduce.rbThe start of this output looks like this…
aa  13
ab  666
ac  1491
ad  867
ae  337
af  380
Running The Hadoop Job
I wrote this bash-based runner script to start the job. It uses Hadoop’s streaming service. This streaming service is what allows us to write our map-reduce scripts in Ruby. It streams to our script’s STDIN and reads our script’s output from our script’s STDOUT.
#!/bin/bash

HADOOP_HOME=/usr/local/hadoop
JAR=contrib/streaming/hadoop-streaming-0.20.2+737.jar

HSTREAMING="$HADOOP_HOME/bin/hadoop jar $HADOOP_HOME/$JAR"

$HSTREAMING \
 -mapper  'ruby map.rb' \
 -reducer 'ruby reduce.rb' \
 -file map.rb \
 -file reduce.rb \
 -input '/user/phil/input/*' \
 -output /user/phil/output
We specify the command to run for the mapper and reducer and use the “-file” parameter twice to attach our two Ruby scripts. It is assumed that all other dependencies are already installed on the machine. In this case we are using no Ruby imports or requires and the Ruby interpreter is already installed on the machines in the Hadoop cluster (it came with the Cloudera Amazon EC2 image). Things become more complicated when you start to run jobs with more dependencies that are not already installed on the Hadoop cluster. This is a topic for another post.
“-input” and “-output” specify which files to read from for input and the directoty to send the output to. You can also specify a deeper level of recursion with more wildcards (e.g. “/user/phil/input/*/*/*”).
Once again, it is important that our SOCKS proxy is running, as this is the secure way that we communicate through to our Hadoop cluster.
sh ~/.whirr/myhadoopcluster/hadoop-proxy.sh
    Running proxy to Hadoop cluster at ec2-72-44-45-199.compute-1.amazonaws.com. Use Ctrl-c to quit.
Now we can start the Hadoop job by running our above bash script. Here is the output the script gave me at the terminal.
packageJobJar: [map.rb, reduce.rb, /tmp/hadoop-phil/hadoop-unjar3366245269477540365/] [] /var/folders/+Q/+QReZ-KsElyb+mXn12xTxU+++TI/-Tmp-/streamjob5253225231988397348.jar tmpDir=null
10/12/30 21:45:32 INFO mapred.FileInputFormat: Total input paths to process : 1
10/12/30 21:45:37 INFO streaming.StreamJob: getLocalDirs(): [/tmp/hadoop-phil/mapred/local]
10/12/30 21:45:37 INFO streaming.StreamJob: Running job: job_201012281833_0001
10/12/30 21:45:37 INFO streaming.StreamJob: To kill this job, run:
10/12/30 21:45:37 INFO streaming.StreamJob: /usr/local/hadoop/bin/hadoop job  -Dmapred.job.tracker=ec2-72-44-45-199.compute-1.amazonaws.com:8021 -kill job_201012281833_0001
10/12/30 21:45:37 INFO streaming.StreamJob: Tracking URL: https://ec2-72-44-45-199.compute-1.amazonaws.com:50030/jobdetails.jsp?jobid=job_201012281833_0001
10/12/30 21:45:38 INFO streaming.StreamJob:  map 0%  reduce 0%
10/12/30 21:45:55 INFO streaming.StreamJob:  map 42%  reduce 0%
10/12/30 21:45:58 INFO streaming.StreamJob:  map 100%  reduce 0%
10/12/30 21:46:14 INFO streaming.StreamJob:  map 100%  reduce 88%
10/12/30 21:46:19 INFO streaming.StreamJob:  map 100%  reduce 100%
10/12/30 21:46:22 INFO streaming.StreamJob: Job complete: job_201012281833_0001
10/12/30 21:46:22 INFO streaming.StreamJob: Output: /user/phil/output
This is reflected if you visit the job tracker console in web browser.
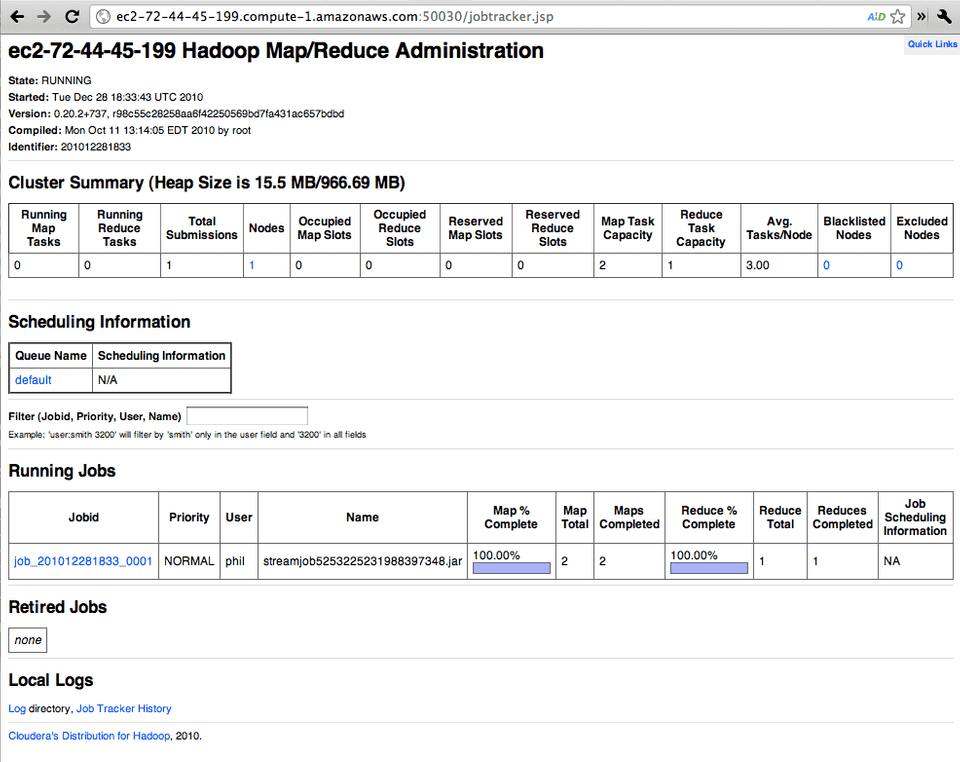
jobTracker after successful run
If you click on the job link you can see lots of information on this job. This job is completed in these images, but with a longer running job you would see the progress as the job runs. I have split the job tracker page into the following three images.
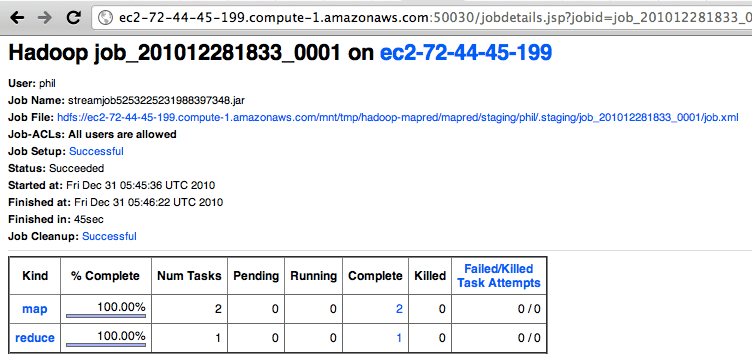
Map-Reduce Job Tracker Page (part 1)
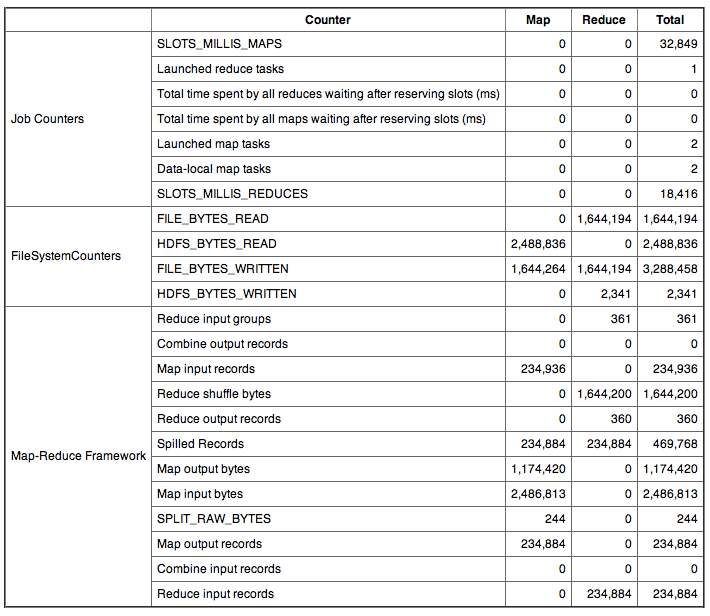
Map-Reduce Job Tracker Page (part 2)
Map-Reduce Job Tracker Page (part 3) Graphs
The Results
Our map-reduce job has run successfully using Ruby. Let’s have a look at the output.
hadoop fs -ls output

Found 3 items
-rw-r--r--   3 phil supergroup          0 2010-12-30 21:46 /user/phil/output/_SUCCESS
drwxrwxrwx   - phil supergroup          0 2010-12-30 21:45 /user/phil/output/_logs
-rw-r--r--   3 phil supergroup       2341 2010-12-30 21:46 /user/phil/output/part-00000
Hadoop output is written in chunks to sequential files part-00000, part-00001, part-00002 and so on. Our dataset is very small, so we only have one 2kb file called part-00000.
hadoop fs -cat output/part-00000 | head
aa  13
ab  666
ac  1491
ad  867
ae  337
af  380
ag  507
ah  46
ai  169
aj  14
Our map-reduce script counted 13 words starting with “aa”, 666 words starting with “ab” and 1491 words starting with “ac”.
Conclusion
Yes, it is an overkill to use Hadoop and a (very small) cluster of cloud-based machines for this example, but I think it demonstrates how you can quickly get your Hadoop cluster up and running map-reduce jobs written in Ruby. You can use the same procedure to fire-up a much larger and more powerful Hadoop cluster with a bigger dataset and more complex Ruby scripts.
Please post any questions or suggestions you have in the comments below. They are always highly appreciated.
Resources
- Apache Hadoop
- Cloudera’s Distribution for Apache Hadoop (CDH)
- Cloudera Hadoop Training VMWare Image
- Map-Reduce Using Perl
- jclouds
- Words file on Unix-like operating systems
- Ruby Weekly
Related Books
If you are interested in learning more about Hadoop, then I recommend reading
Hadoop: The Definitive Guide (2nd Edition) by Tom White.
kudos on the good article
I was able to follow along and everything worked (after correcting for my typos).
One thing that wasn’t clear, one can be in any dir for the ruby & bash file work. I had done this originally in the hadoop folder.
thanks
Thank you for your comment Andy! I’m glad you followed it all the way through and it worked.
In this example the Ruby scripts for Map and Reduce are in the same directory as the bash script that I created for running the job. They do not need to be. You just need to tell the job starter where to find them. For instance, for the map.rb script I have…
-file map.rb
This is a relative path, meaning it’s in the same directory. It could also be relative in another directory..
-file ../someotherdirectory/map.rb
or we could give an absolute path…
-file /Users/phil/someotherdirectory/map.rb
The bash script can also be written is any directory. The path to the JAR file is absolute, so the only other dependencies are the Map and Reduce scripts as I mentioned above.
I hope that answers your question.
Hi Phil,
one more question,
is there a way to use s3 buckets for the input and output?
That’s a great question Andy and the answer is “yes”. You will need to modify your hadoop-site.xml to replace HDFS with S3.
Check out this wiki page…
https://wiki.apache.org/hadoop/AmazonS3
This would make a good follow post, so keep watching this space!
Phil – thanks very much for taking the time to write this up! I am new to AWS and EC2 and am running into a problem at the point where I first try and launch clusters – wondering if you can please help? I have my Access Key ID and Secret Access Key in my hadoop.properties, and the output I get is as follows:
[~/src/cloudera/whirr-0.1.0+23]$ bin/whirr launch-cluster --config hadoop.properties                                                                                                     rvm:ruby-1.8.7-p299
Launching myhadoopcluster cluster
Exception in thread "main" com.google.inject.CreationException: Guice creation errors:
1) No implementation for java.lang.String annotated with @com.google.inject.name.Named(value=jclouds.credential) was bound.
  while locating java.lang.String annotated with @com.google.inject.name.Named(value=jclouds.credential)
    for parameter 2 at org.jclouds.aws.filters.FormSigner.(FormSigner.java:91)
  at org.jclouds.aws.config.AWSFormSigningRestClientModule.provideRequestSigner(AWSFormSigningRestClientModule.java:66)
1 error
  at com.google.inject.internal.Errors.throwCreationExceptionIfErrorsExist(Errors.java:410)
  at com.google.inject.internal.InternalInjectorCreator.initializeStatically(InternalInjectorCreator.java:166)
  at com.google.inject.internal.InternalInjectorCreator.build(InternalInjectorCreator.java:118)
  at com.google.inject.InjectorBuilder.build(InjectorBuilder.java:100)
  at com.google.inject.Guice.createInjector(Guice.java:95)
  at com.google.inject.Guice.createInjector(Guice.java:72)
  at org.jclouds.rest.RestContextBuilder.buildInjector(RestContextBuilder.java:141)
  at org.jclouds.compute.ComputeServiceContextBuilder.buildInjector(ComputeServiceContextBuilder.java:53)
  at org.jclouds.aws.ec2.EC2ContextBuilder.buildInjector(EC2ContextBuilder.java:101)
  at org.jclouds.compute.ComputeServiceContextBuilder.buildComputeServiceContext(ComputeServiceContextBuilder.java:66)
  at org.jclouds.compute.ComputeServiceContextFactory.buildContextUnwrappingExceptions(ComputeServiceContextFactory.java:72)
  at org.jclouds.compute.ComputeServiceContextFactory.createContext(ComputeServiceContextFactory.java:114)
  at org.apache.whirr.service.ComputeServiceContextBuilder.build(ComputeServiceContextBuilder.java:41)
  at org.apache.whirr.service.hadoop.HadoopService.launchCluster(HadoopService.java:84)
  at org.apache.whirr.service.hadoop.HadoopService.launchCluster(HadoopService.java:61)
  at org.apache.whirr.cli.command.LaunchClusterCommand.run(LaunchClusterCommand.java:61)
  at org.apache.whirr.cli.Main.run(Main.java:65)
  at org.apache.whirr.cli.Main.main(Main.java:91)
PS: The rvm:ruby-1.8.7-p299 is part of my prompt and not in the output.
Thanks in advance for any pointers on getting this resolved.
Regards,
Navin
Hi, Navin.
There’s probably an issue with the property syntax inside your hadoop.properties. Have a look at https://incubator.apache.org/projects/whirr.html and https://cwiki.apache.org/WHIRR/configuration-guide.html
If you still have issues, send your query to the user list, you’ll get on track quickly!
[email protected]
Cheers,
-Adrian
Um, yes, sorry! A problem with “whirr.credentials” getting truncated to “whirr.cred” while copying keys across. How embarrassing!
Apologies – and thanks for taking the time to reply …
Navin
Excellent! Glad you got if figured out. When you get through to the end of the example, let us know your thoughts are of using Whirr + Hadoop + Ruby.
Worked my way through the tutorial soon after my last comment and have been meaning to come back and thank you for writing this up! I am inspired to pick something from this list
https://www.quora.com/What-are-some-good-toy-problems-in-data-science
and play some more.
Not all is well though – I received a bill from AWS for $100 this morning! While following your tutorial I fumbled my way through signing up for AWS and assumed that I would only ever be operating within a free tier – boy was I wrong! Some three weeks later and I realise that I’ve had “small” EC2 servers going all this time …
So, may I suggest that you please augment your post to direct the reader to shut down (and terminate) their EC2 instances after they are done with the tute, and, perhaps, include directions on how to ensure that they use Amazon’s free https://aws.amazon.com/free/ tier?
It is evident that I’ve made some silly mistakes while following this but I hope I am not atypical of your garden variety newbie that is curious about big data. I hope that I find a way to get Amazon to reverse charges (don’t like my chances though). In any case, my enthusiasm is not dampened – thanks again for getting me started
Navin
Further update: Amazon replied to my request within 12 hours and, in fact, did reverse charges. Phew!
I have just posted “Quickly Launch A Cassandra Cluster On Amazon EC2″, which follows a very similar process. https://www.bigfastblog.com/quickly-launch-a-cassandra-cluster-on-amazon-ec2
Great post, thank you very much for that.
Next question though… how do you use Cassandra for input/output (while still using Ruby)?
I know you can run Hadoop jobs against Cassandra in Java with the InputFormat they provide, but how to do so using streaming?
What a great post! Really clearly written and keeps to it’s promise of being able to demonstrate through repeatable steps. Particularly liked the cues for tea breaks for the lengthy download/install steps. Nice work!
When i would like fire up a customized ec2 instance, i added following parameters into hadoop.properties:
But it doesn’t work. Any thought? thanks
I think you would be best taking this to the whirr user list, where you can let us know what didn’t work:
https://cwiki.apache.org/confluence/display/WHIRR/MailingLists
There are recipes in the latest version of whirr here, as well:
https://svn.apache.org/repos/asf/incubator/whirr/trunk/recipes/hadoop-ec2.properties
Unrelated, but if you don’t mind trying 0.5.0, voting it up can get the new rev, including recipes released!
https://people.apache.org/~tomwhite/whirr-0.5.0-incubating-candidate-1/
Cheers,
A
Cool, I will try both, post the questions and new Whirr, will update here later on if i get any solution. Thx
I tried whirr 0.5.0, and it still doesn’t work.
It worked well if my hadoop.properties as below:
whirr.service-name=hadoop
whirr.cluster-name=myhadoopcluster
whirr.instance-templates=1 jt+nn,1 dn+tt
whirr.provider=ec2
whirr.identity=
whirr.credential=
whirr.private-key-file=${sys:user.home}/.ssh/id_rsa
whirr.public-key-file=${sys:user.home}/.ssh/id_rsa.pub
whirr.hardware-id= m1.large
whirr.location-id=us-west-1
whirr.hadoop-install-runurl=cloudera/cdh/install
whirr.hadoop-configure-runurl=cloudera/cdh/post-configure
But once i added two more lines into hadoop.properties file, it went wrong:
I have posted a question on whirr forum and see if i could get any solution. Will update here if i get anything. thx
There’s a bug in your reduce script. You output the total only when you get a new key. So the last key’s total will never be included in the output.
Thanks Jack! You’re right. Well spotted.
I started using EC2 yesterday and I got this working today thanks to your article. However, it’s not without twist and turn.
1. I got https://whirr.s3.amazonaws.com/0.3.0-cdh3u1/util/configure-hostnames not found error when I run ‘whirr launch-cluster’. They haven’t put configure-hostnames for cdh3u1 in s3 yet. I workaround by adding –run-url-base https://whirr.s3.amazonaws.com/0.3.0-cdh3u0/util. I got this advice from https://www.cloudera.com/blog/2011/07/cdh3u1-released/
2. I followed the instruction to set up Hadoop client in the the host initiating whirr and got the following error when it tried to connect to name node.
11/08/07 01:03:48 INFO ipc.Client: Retrying connect to server: ec2-107-20-60-75.
compute-1.amazonaws.com/10.116.78.198:8020. Already tried 9 time(s).
Bad connection to FS. command aborted. exception: Call to ec2-107-20-60-75.compu
te-1.amazonaws.com/10.116.78.198:8020 failed on local exception: java.net.Socket
Exception: Connection refused
It has to do with security. I checked the security group jclouds#myhadoopcluster3#us-east-1. It allows inbound on 80, 50070, 50030 only from the host initiating whirr launch-cluster and allow inbound on 8020, 8021 only from the name node host. I added rules to allow inbound on 8020, 8021 from the host initiating whirr and apply the rule change. That doesn’t help. In my case, the host initiating whirr launch-cluster is a EC2 instance too.
3. I can ssh to cluster hosts from the host initiating whirr without any key. iptable is empty and selinux is disabled. Network rules seems set up outside the linux box. No luck.
4. I ends up transferring files to name nodes and run map reduce job there. Whirr script create /user/hive/warehouse but no /user/ec2-user. Need to create that directory and input sub-directory. You might also add -jobconf mapred.reduce.tasks=1 since the default is 10 in this case.
Thanks.
Hi threecuptea,
Do you mind re-posting this to whirr’s mailing list?
https://incubator.apache.org/whirr/mail-lists.html
There’s a release almost finished which should support cdh much better (v0.6)
I guess the reducer is missing the code,because the last line when it completes, has to put the result to the output.
I ran the same logic in Java and then in Ruby using hadoop and realized that my last node is missing in the result data. so I added the following line at the very end of reducer.rb
puts prev_key + separator + key_total.to_s
and it worked.
Hi Phil,
I am using Hadoop Mapreduce to predict secondary structure of a given long sequence. The idea is, I have a chunks of segments of a sequence and they are written into a single file input where each line is one segment. I have used one of the programs for secondary structure predictions as my mapper code (Hadoop Streaming).
The out put of the mapper was successful that it produces the predicted structures in terms of dot-bracket notation. I want to use a simple reducer that glue all the outputs from the mapper in an orderly manner.
For Example, If my input was like
….
And my mapper output is a predicted structure but not in order
What I am looking is a reducer code that sorts and Glue and outputs in a form similar to the following:
……
Any help…Thanks
Hello,
We have following properties set :
whirr.service-name=hadoop
whirr.cluster-name=myhadoopcluster
whirr.instance-templates=1 jt+nn,1 dn+tt
whirr.provider=ec2
whirr.credential=mYar/KSbx+UL+nqGr9hSgGHIOqXC9tjNcuO9UwF/
whirr.identity=AKIAJCDTYGREJYIECQZA
whirr.private-key-file=${sys:user.home}/.ssh/id_rsa
whirr.public-key-file=${sys:user.home}/.ssh/id_rsa.pub
whirr.hadoop-install-runurl=cloudera/cdh/install
whirr.hadoop-configure-runurl=cloudera/cdh/post-configure
whirr.image-id=ami-3bc9997e
whirr.hardware-id=i-bffa23f8
whirr.location-id=us.west-1c
But we are getting following error:
[ec2-user@ip-10-170-103-243 ~]$ ./whirr-0.3.0-cdh3u1/bin/whirr launch-cluster –config hadoop.properties –run-url-base https://whirr.s3.amazonaws.com/0.3.0-cdh3u0/util
Bootstrapping cluster
Configuring template
Exception in thread “main” java.util.NoSuchElementException
        at com.google.common.collect.AbstractIterator.next(AbstractIterator.java:147)
        at com.google.common.collect.Iterators.find(Iterators.java:679)
        at com.google.common.collect.Iterables.find(Iterables.java:555)
        at org.jclouds.compute.domain.internal.TemplateBuilderImpl.locationId(TemplateBuilderImpl.java:492)
        at org.apache.whirr.service.jclouds.TemplateBuilderStrategy.configureTemplateBuilder(TemplateBuilderStrategy.java:41)
        at org.apache.whirr.service.hadoop.HadoopTemplateBuilderStrategy.configureTemplateBuilder(HadoopTemplateBuilderStrategy.java:31)
        at org.apache.whirr.cluster.actions.BootstrapClusterAction.buildTemplate(BootstrapClusterAction.java:144)
        at org.apache.whirr.cluster.actions.BootstrapClusterAction.doAction(BootstrapClusterAction.java:94)
        at org.apache.whirr.cluster.actions.ScriptBasedClusterAction.execute(ScriptBasedClusterAction.java:74)
        at org.apache.whirr.service.Service.launchCluster(Service.java:71)
        at org.apache.whirr.cli.command.LaunchClusterCommand.run(LaunchClusterCommand.java:61)
        at org.apache.whirr.cli.Main.run(Main.java:65)
        at org.apache.whirr.cli.Main.main(Main.java:91)
Can we get any help ? What shold we do ?
Thanks,
S.Sarkar
Nice tutorial, Everything work just how it should be !!!
Just a small question , what if I wanna connect to the instance , where I can find the key in order to connect to it.
Cheers,
Joao
Phil, thanks for the detailed tutorial!
I had my custom MapReduce application up and running on an EC2 cluster just in a few hours.
I reproduced the steps with whirr-0.7.1 and hadoop-0.20.2-cdh3u4.
Great! I’m glad the process still working and the blog post is still valid. Thanks for the comment.
hi to all,
Good Morning,
I had a set of 22documents in the form of text files of size 20MB and loaded in hdfs,when running hadoop streaming map/reduce funtion from command line of hdfs ,it took 4mins 31 secs for streaming the 22 text files.How to increase the map/reduce process as fast as possible so that these text files should complete the process by 5-10 seconds.
What changes I need to do on ambari hadoop.
And having cores = 2
Allocated 2GB of data for Yarn,and 400GB for HDFS
default virtual memory for a job map-task = 341 MB
default virtual memory for a job reduce-task = 683 MB
MAP side sort buffer memory = 136 MB
And when running a job ,Hbase error with Region server goes down,Hive metastore status service check timed out.
Note:[hdfs@s ~]$ hadoop jar /usr/lib/hadoop-mapreduce/hadoop-streaming-2.2.0.2.0.6.0-76.jar -D mapred.map.tasks=2 -input hdfs:/apps/*.txt -output /home/ambari-qa/8.txt -mapper /home/coartha/mapper.py -file /home/coartha/mapper.py -reducer /home/coartha/reducer.py -file /home/coartha/reducer.py
Thanks & regards,
Bodla Dharani Kumar,